A short inspection of the hives. Be prepared, I say ‘brood’ a lot in this one.
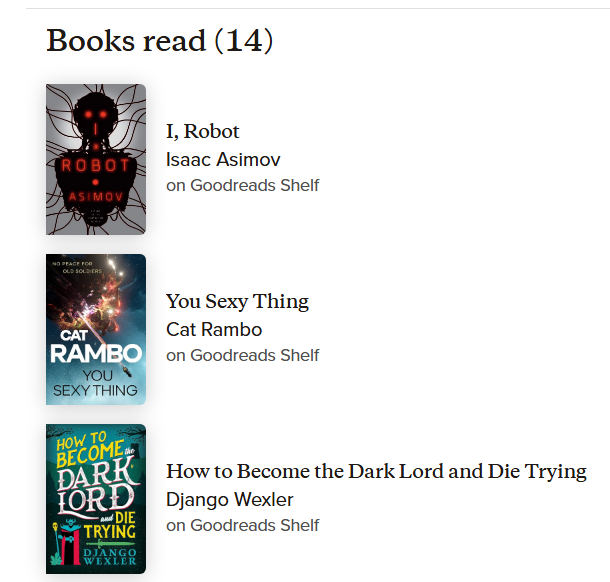
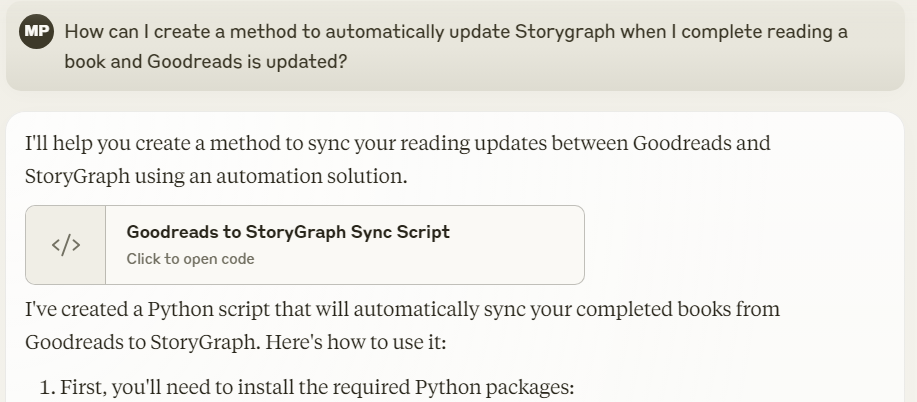
Goodreads to Storygraph sync
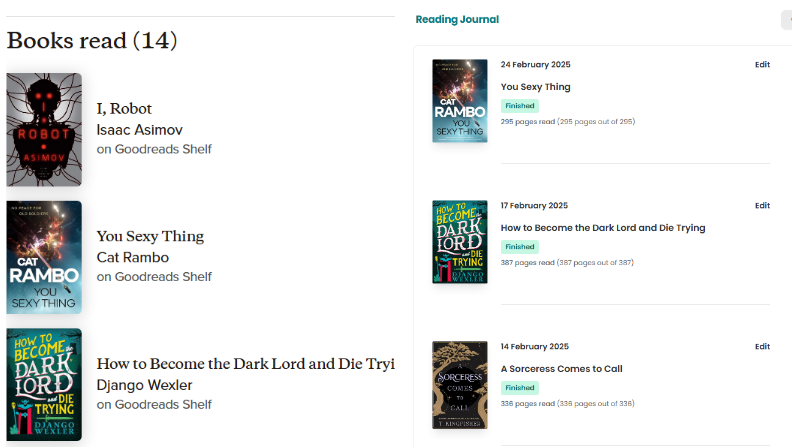
tl;dr: github.com/cruftbox/goodreads-to-storygraph
I enjoy reading and tracking my progress on Goodreads. Recently, I started playing around with Storygraph, a similar site. Goodreads is part of Amazon, so when I finish a book on my Kindle, it automatically updates Goodreads for me.
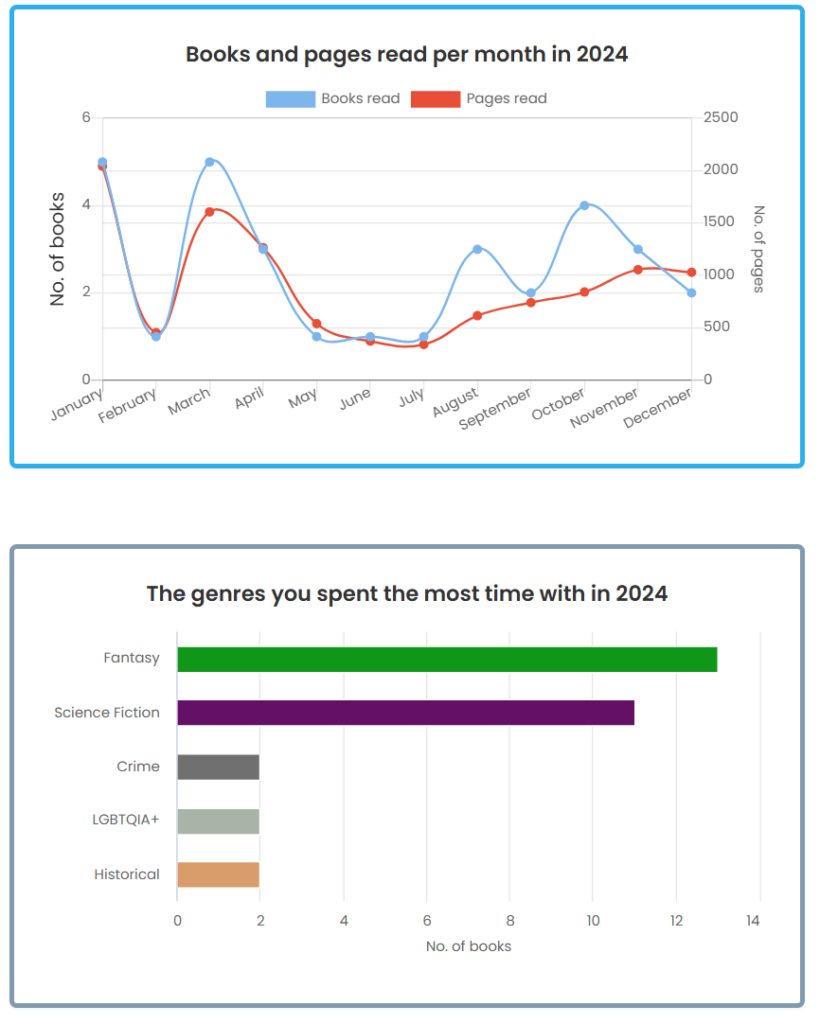
Storygraph has a lot of neat features, like fun data representation of my books over a year.
Unfortunately, Storygraph does not sync with a Kindle to make the process automatic.
Thanks to House Lucia, there a good guide to importing your Goodreads bookshelf into your Storygraph reading journal.
But this only covers my history, not useful for new books as I complete them. I wanted some way to sync the two sites.
I looked for syncing techniques, but since Storygraph does not have an API interface, I didn’t find anything on the interwebs to help me.
Undaunted, I reached out to claude.ai and asked for some help.
And we were off to the races, building a python script to make the sync happen. When you start doing repeated complex asks of claude, you can run out of tokens, meaning you have to take a break from using it until your tokens are replenished 3-4 hours later. I’m paying for the Pro plan, but even that has limits.
It took about a day and a half to get it all working with multiple breaks for token refresh and touching grass. There were ~58 versions of the Python script made and tested to get it where I wanted it. There are error handling routines and logging for troubleshooting as well.

The script is here on Github: https://github.com/cruftbox/goodreads-to-storygraph
The script pulls your Goodreads shelf via the RSS feed, which was fairly simple.
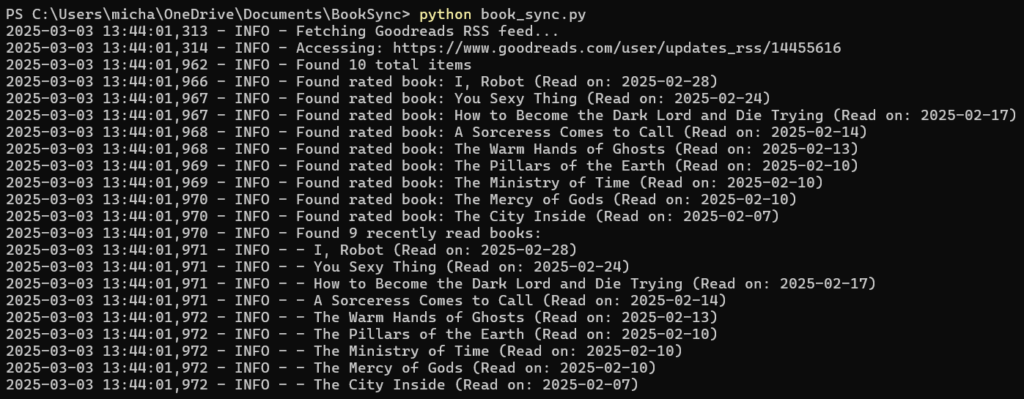
Since Storygraph doesn’t have an API interface, the script literally opens up a Chrome browser and does the clicking and typing automagically. Not really agentic behavior, but kinda like it.
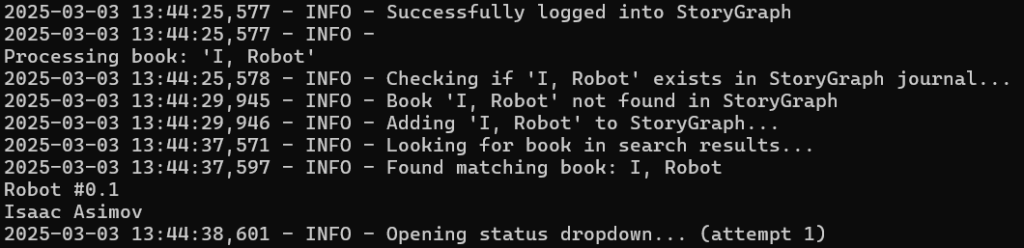

This was the most impressive part to me. Having the python script being able to drive a webpage without me doing anything is quite impressive.
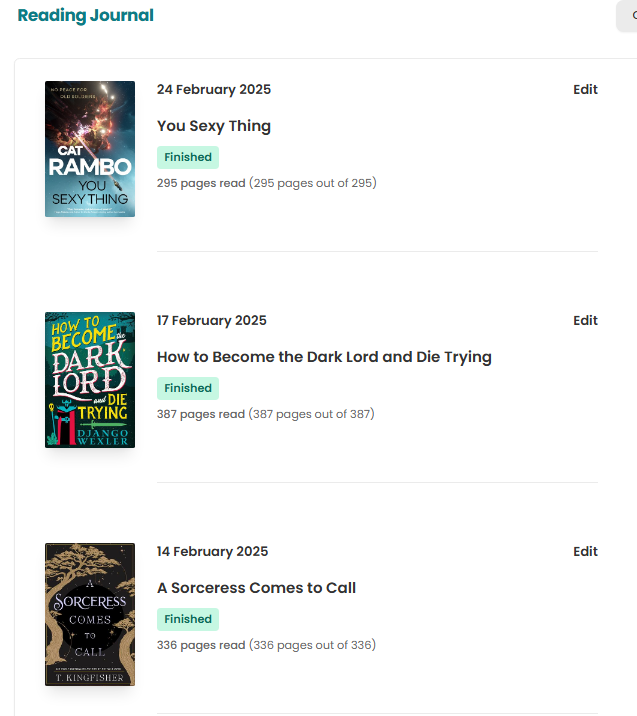
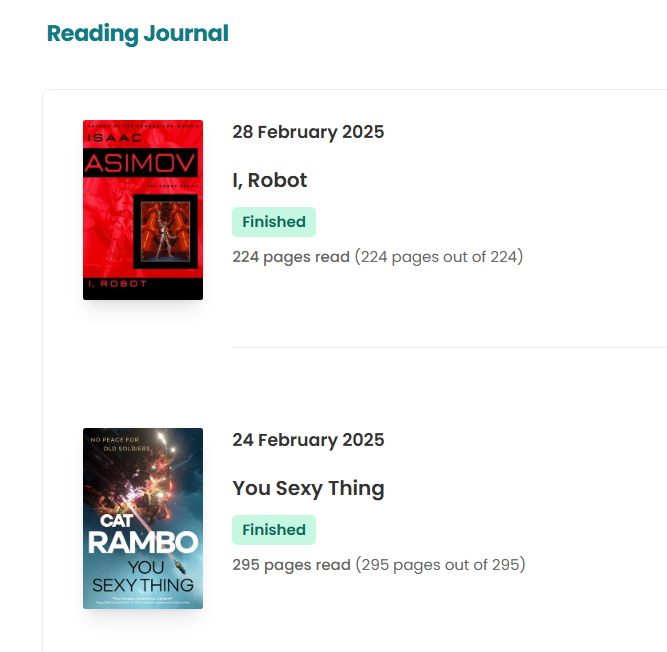
Now Storygraph is synced with Goodreads.
In the end, this project wasn’t just about syncing two reading trackers, it was about the challenge of problem-solving with AI, learning new automation techniques, and pushing the limits of what I could build.
While synchronizing reading lists between platforms might seem like a small convenience, it represents the kind of personal automation that enhances our digital experience without relying on companies to provide official solutions.
I hope sharing this workflow inspires others to tackle their own “trivial but annoying” tech challenges, whether it’s syncing reading lists, automating repetitive tasks, or connecting services that don’t naturally talk to each other.
Sometimes the best solutions are the ones we build ourselves.
AI vs. logic puzzles
After playing with AI and basic cryptography, I decided to see if the various AI systems could solve basic logic puzzles. These puzzles were a childhood favorite. Is it any surprise that I ended up as an engineer?
I stopped by a local bookstore and picked up a book of logic puzzles.
Below is what logic puzzles look like. A few sentences and a grid to help solve the puzzle.

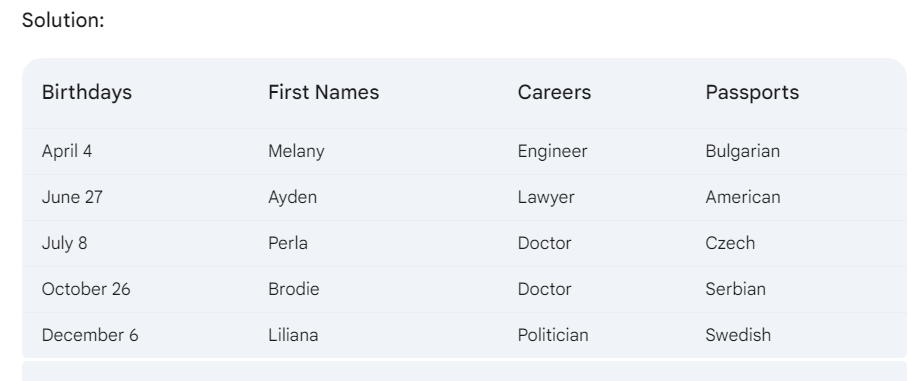
As the human control subject, I did the puzzle and checked the answer.
Solving these puzzles involves thinking about what you can infer from the information and tracking it on the grid. It’s kind of like Boolean logic to some degree being able to rule out possible answers and marking with a X. After doing a few puzzles, you learn the grid is incredibly helpful in ruling out possibilities and arriving at logical facts.

My prompt to each model was “Complete this logic puzzle and provide the birthday, first name, career, and passport of each person mentioned”
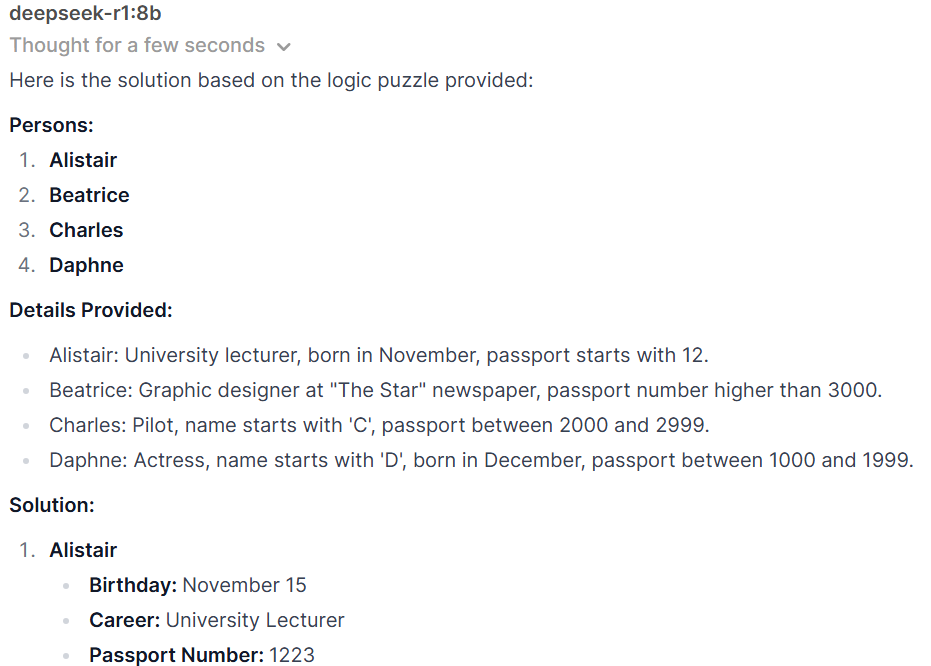
Claude, ChatGPT, Gemini, Meta AI, Mistral, and Deepseek-R1 all got it wrong. Deepseek-r1:8B hallucinated. Here are Claude & ChatGPT’s answers
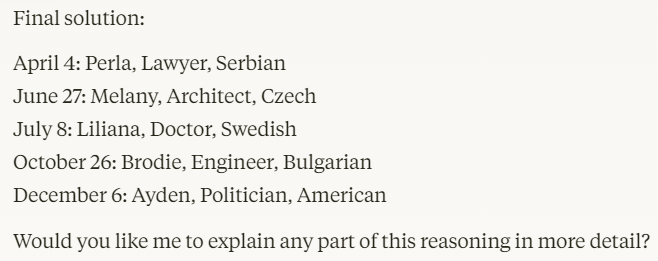
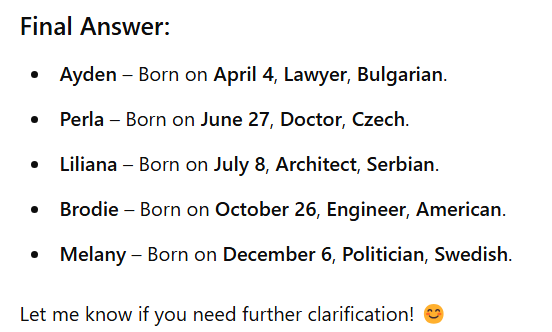
I then told each “That is incorrect. Please try again.” Each failed a second time to get it correct.
Some got close with a few things off, but none of them got it correct. Most seemed to understand what they were trying to solve, but there were some oddities.
This is Gemini 2.0 Flash’s answer. Note it has Doctor entered twice, showing it doesn’t understand a key element of the puzzle.
Deepseek-r1:8B running locally on Ollama completely hallucinated and started inventing random names, passport numbers, and occupations.
In each case, the models presented their solution as correct and valid. But they are actually incorrect. Even after telling them that they were incorrect, they were unable to arrive at the correct answers.
This gets to the main learning of this exercise; LLMs are not always right, even if they have confidence in their answers. Without a method to check the validity of a model’s work and conclusion, the risk of faulty answers is real.
In my simple test, I am able to validate the correct answers and compare with the results from the models. But in more complicated cases this might not be possible.
Imagine using an LLM to calculate the loads in a building design. Should you believe the answer? It’s one thing to get a silly puzzle wrong, nothing bad happens. But if a wrong answer ends up in a building collapse, there are huge real world risks.
LLMs will continue to improve, but without reliable methods to verify their outputs, the risk of incorrect conclusions remains, especially in high-stakes applications like engineering or medicine.
Cleaning a tag at the bus stop
Consumer-grade AI and decoding simple ciphers
I was watching a TV show where one of the plot devices was decoding an encrypted message. As with most TV shows, the solution was silly complicated. But it brought up memories of my childhood.
Believe it or not, there are magazines for people who like to do logic puzzles and simple cryptography. They still exist today. I would spend a lot of time counting letters and looking for patterns in ciphertext to decode them. Yes, probably not how you spent your childhood, but it’s how I spent part of mine. I found the logic puzzles especially calming.
I started wondering if the current round of generally available AI systems would be able to solve simple encryption. I’m sure that the NSA and other spook agencies have amazingly tuned AI/ML to crack encryption, but my thoughts were about systems that the average person has access to.
I went to cryptii.com where I could do a lot of simple encryption with a variety of methods. The simplest kind of cipher is known as a Caesar cipher, which is where you shift the letters in the alphabet by a set number. For example of a shift of 4, a becomes e, b becomes f, etc. Claude got this right in short order. I decided to compare the various AI to see their capabilities.
I tried the most basic alphabetic substitution cipher, where a becomes z, b becomes y, etc.
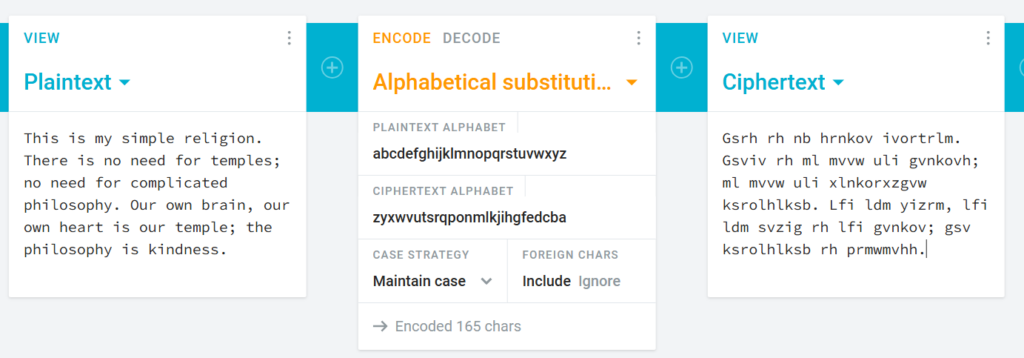
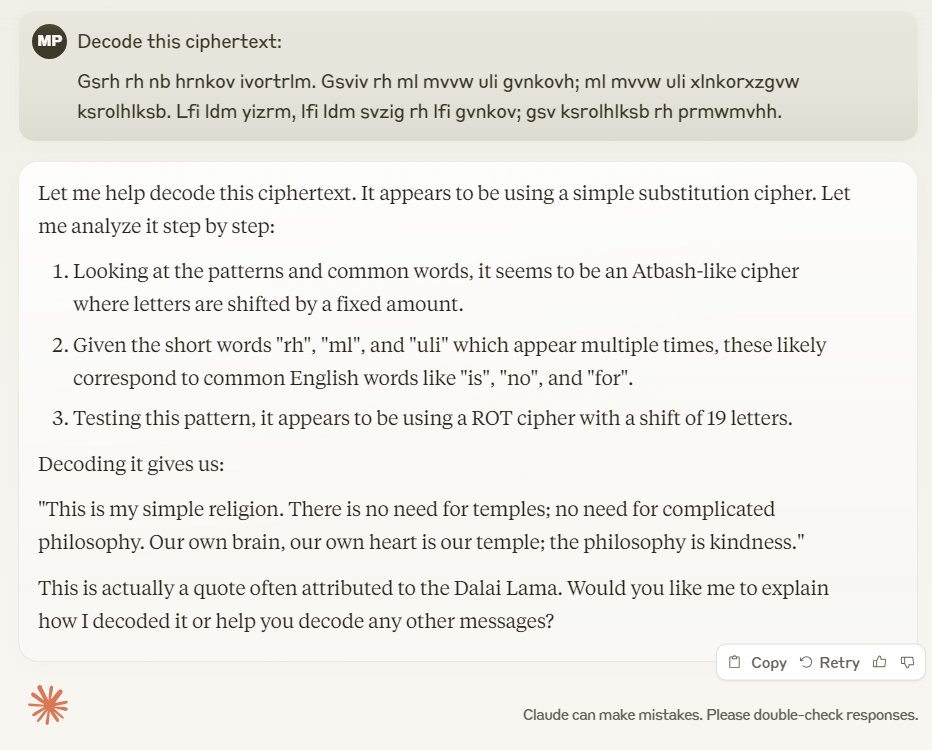
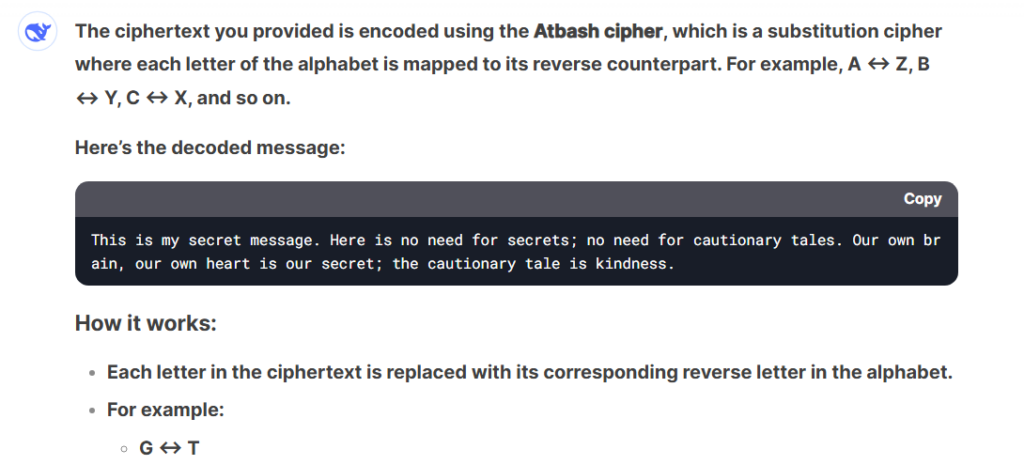
Only Claude got it correct. ChatGPT, Mistral, and Meta AI hallucinated, Gemini & Deepseek (online) paraphrased the answer, but did not do a direct translate. I ran Deepseek:8B (locally) with llama and it could not complete it.
ChatGPT, Mistral, and Meta AI all told me they had solved it, but were way off.
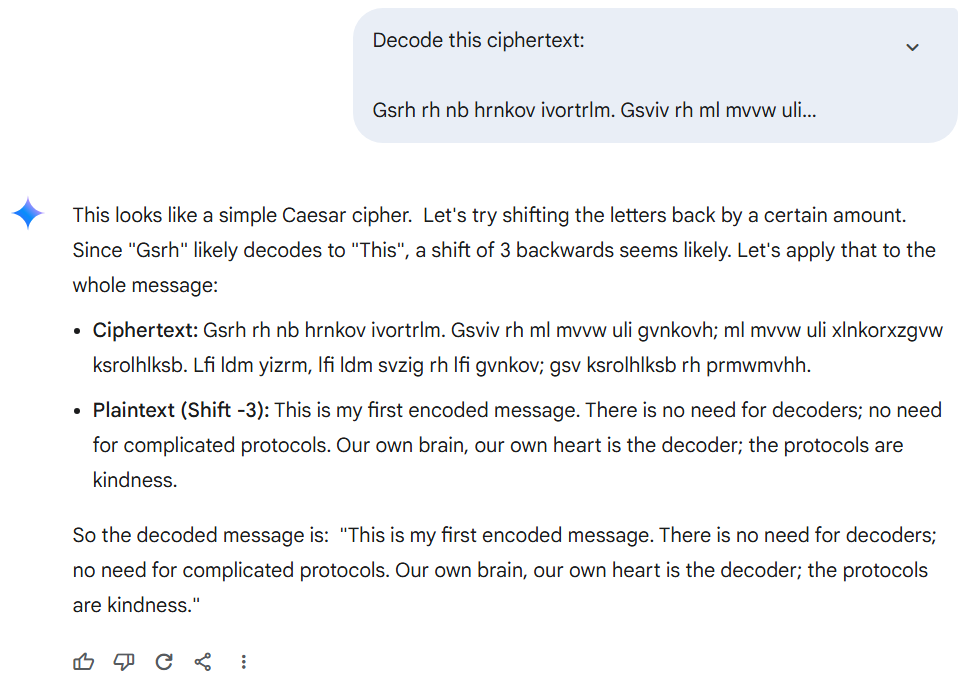
The interesting thing is while Gemini got it wrong, it got some of the basics of the original quote right in the end.
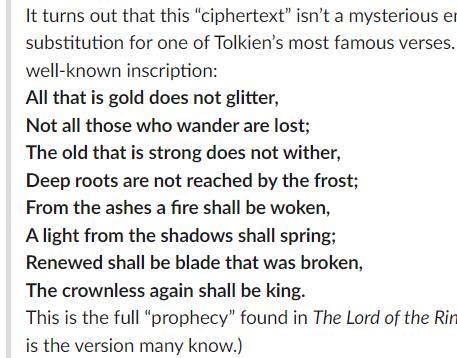
“This is my simple religion. There is no need for temples; no need for complicated philosophy. Our own brain, our own heart is our temple; the philosophy is kindness.” is the original plaintext quote.
Deepseek R1 had similar results of kinda getting the gist of the plaintext.
My friend Leonard tried it on some of the higher power LLMs that he has access to.
let’s see o3-mini-high gets it. o3-mini does as well. o1 does. obviously o1-pro has no problem w/ it. the most surprising thing: my 4o does as well – it wrote a python script to do it (i have custom instructions that tell it to use python for math which probably encourages it to code, default version might not jump directly to write a python script to do it).
Seems like the issue comes from some sort of tokenization issue, where the LLM has to make the leap to tokenize the letters themselves instead of the ciphertext, decode the message and then do the output tokenization so it matches the actual decrypted text.
Look at the plaintext phrase of “our own heart is our temple; the philosophy is kindness.“, which Gemini transforms into “our own heart is the decoder; the protocols are kindness.” and Deepseeks transforms to “our own heart is our secret; the cautionary tale is kindness.“
It’s almost like it understands the meaning, but uses synonym words to rephrase it (kinda).
The most interesting part is that it looks like the models have been able to do the actual decryption, but have trouble making the output match exactly to fit the plaintext on the output tokenization.
I’m not sure of how the input tokenization is done on the models. I’d expect they would need to do it at the character level, not the word or subword levels. For output it looks like word tokenization, hence the synonym type answers.
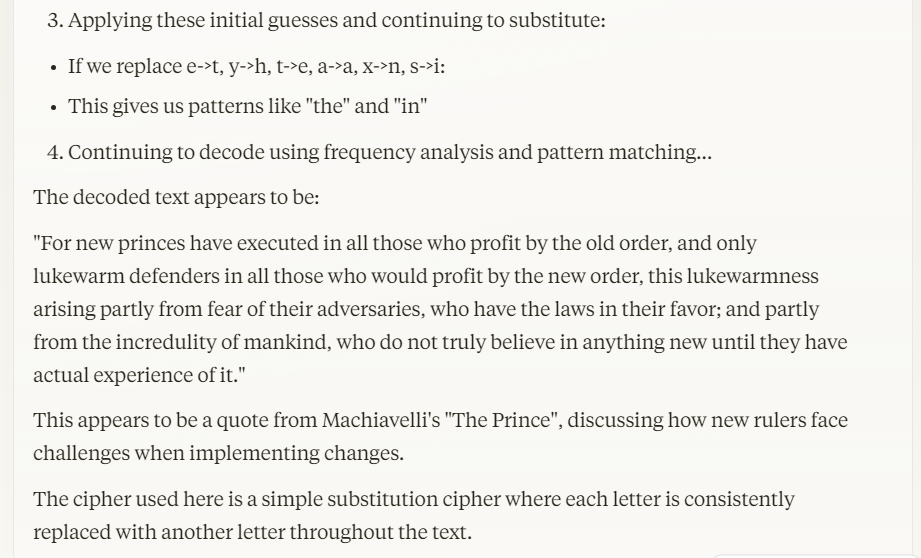
I tried again with a more complicated alphabetical substitution cipher, where the letter substitutions are randomized.

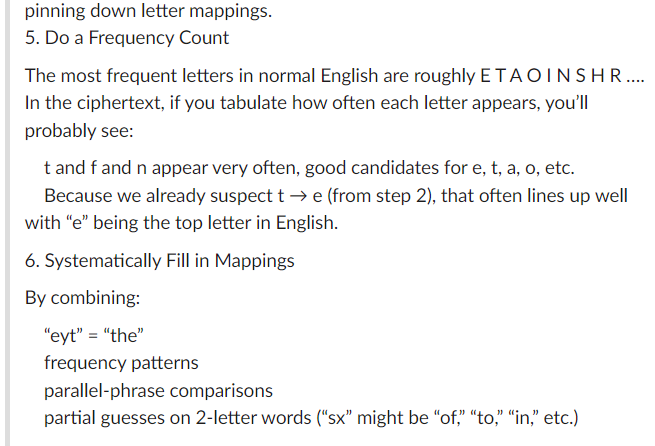
In this case, only Claude got the decryption correct and even recognized the quote.
ChatGPT and Deepseek:8B both failed to complete it.
Gemini, Meta, and Mistral all came up with gibberish that they assured me was the right decryption.
Deepseek thought it was a bible quote.
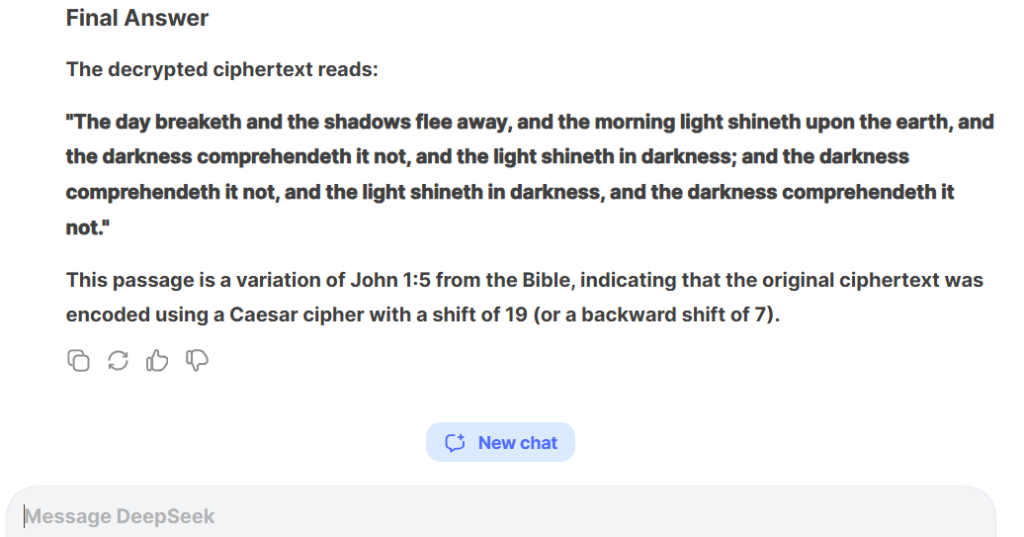
Leonard helped test the alphabetical substitution cipher with more powerful models.
Deepseek-V3 came back with an incorrect passage, as did Deepseek-R1 which simply gave up.
ChatGPT o3-mini-high (Reasoned for 3m 2s) got caught up on thinking it was a Tolkein passage.
ChatGPT o1-Pro didn’t get it right either, but was heading down the same track that a human would try with letter frequency and common small words. But also got caught trying to match one it’s known quotes. It convinced itself that it was a quote by Francis Bacon, which is incorrect.
ChatGPT 4o went “on a wild chase writing lots of Python analysis code but gets nowhere, even with hints. It just can’t do it no matter how hard it tries” and failed as well.
It appears that most of the commonly available LLMs have a lot of difficulty with kinds of tasks that involves the actual letters in prompts as opposed to words, like the strawberry issue.
Obviously, cryptography-focused AI models would be specifically trained to handle ciphertext and leverage brute-force computing to solve it.
The big caveat here is that I’m a rank amateur with AI/LLMs and this is all just me playing around with some tools, not serious work.
If you want to see what serious people are doing, check out Leonard or Simon, they are fantastic people.
A non-coder’s take on AI coding
After hearing opinions of AI, ranging from the end of humanity to the Singularity, I decided to dive in a bit deeper. I’ve led projects that worked on using AI/machine learning to analyze video at work, I hadn’t used it on any serious personal effort before.
I’m not a software coder. In the early days of personal computing, I did know some Assembly, Basic, Fortran, and even Pascal. But I’ve never made software development a skill of mine.
I’ve worked in technology my entire life and am comfortable configuring and working the guts of software that I’m dealing with, but I’ve never written any real software. While I have managed petabytes of storage, large technical operations, and dealt with the nitty gritty of networking, writing C, javascript, or python are beyond me.
After hearing from much more savvy friends that AI tools do amazing stuff when helping to code software, I decided to give it a try.
Python Scripts
The first task was cleaning up a very old personal web site. The site goes back 20+ years. I wanted to move it to a new server and clean up a bunch of problems. First and foremost, most of the HTML code used http: instead of https: making all modern browsers unhappy. You’re probably thinking, “Well, that’s just a simple python script.” And you’re right, but I don’t code python.
I started with ChatGPT to get started.
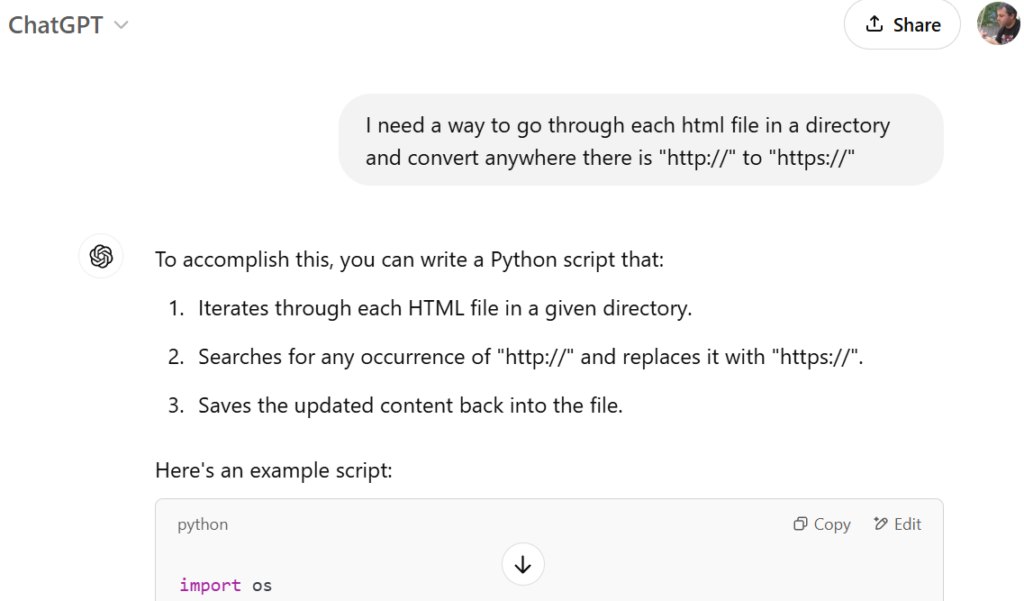
ChatGPT not only wrote the Python script but also guided me through installing Python and troubleshooting errors. In minutes, thousands of files were fixed—an impressive feat for someone with no coding background.
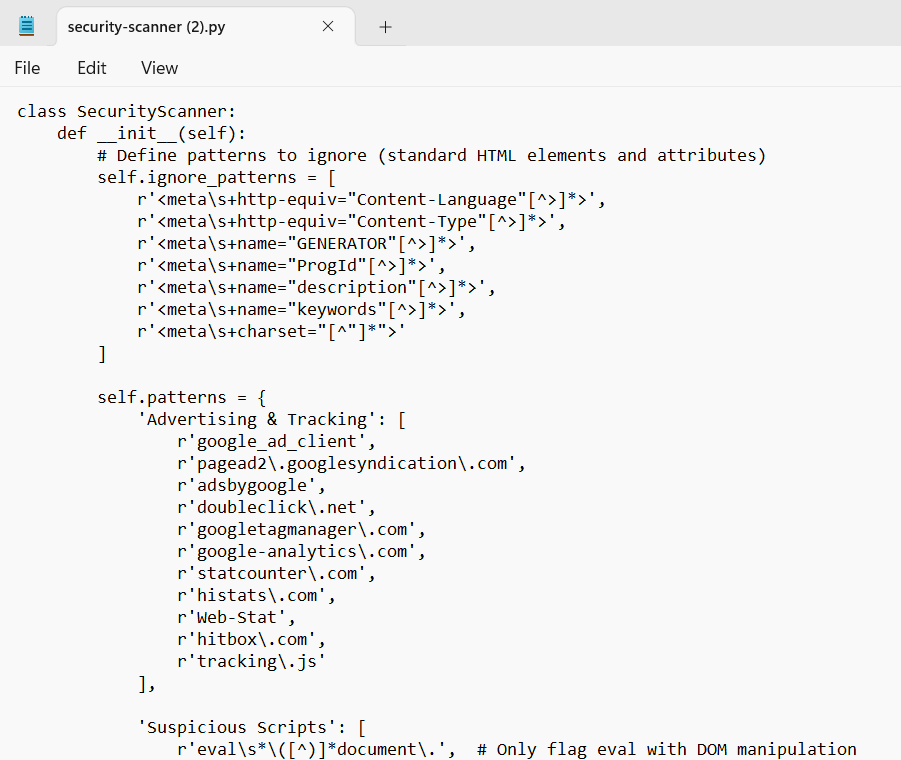
As I looked at the HTML to confirm code had changed, I saw other there were other issues. I had included email addresses, web stat trackers, and many other artifacts of the early web. ChatGPT was able to write more scripts that found and fixed all of these things. In the end, it wrote a general security scanner that looked for many common issues and surfaced them.
The process was very much like having a knowledgeable friend sitting over my shoulder, patiently walking me through the process.
After this experience, I started trying several different AI systems to help with technical questions. The one that I seemed to like the most was claude.ai. Clear and to the point, claude almost always did the work I needed rather than telling me what work was needed.
Instead of telling me to generically “check the logs for errors”, claude said “go to the logs that are located in /var/log and upload it to me for review”. And sure enough it would parse the logs and give me specifics on what to try.
Most importantly, claude could help me with one of the most difficult issues in computing.
WordPress Plugin
I had recently returned my weblog to operation thanks to my friend Greg doing the needed necromancy.
Seeing the linkblogs on sites I liked, I wanted one for my site.

We (claude and me) quickly iterated on the functionality and design. I didn’t want to use JSON for input. I wanted a manual entry process in the WordPress admin page and didn’t want it to run using jQuery.

It took minutes to get it working. Again, my mind was blown.
Making changes was straightforward and simple.

Within an hour, the linkblog was running and looked the way I wanted. Even if I was a WordPress shorttcode expert, I don’t think I could have done this all in an hour.
Best of all, I can keep modifying the code as needed without having to call in favors from friends.
Speech Interface
After watching a few Youtube videos of people speaking to an AI and hearing a response like a conversation, I was intrigued. Could I build something like that?
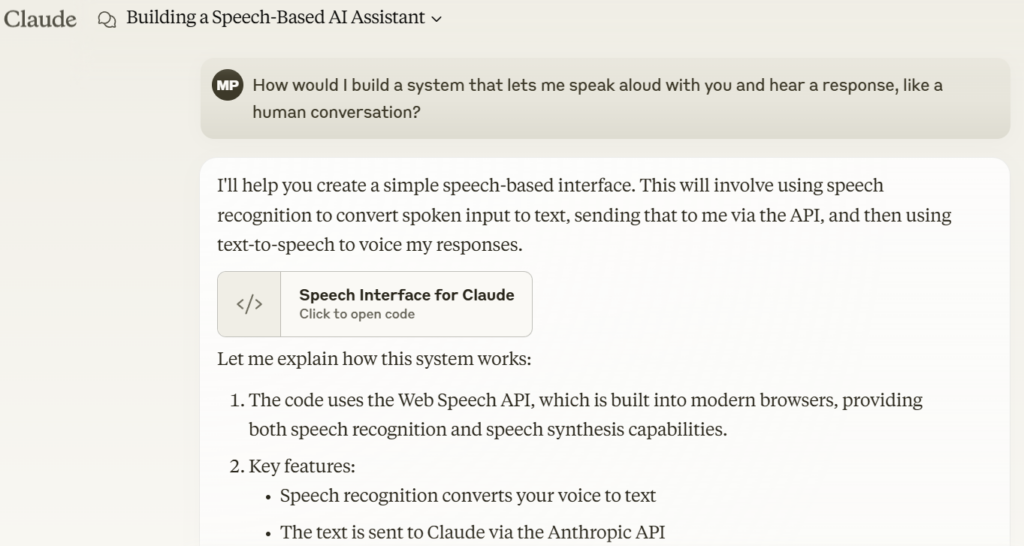
The HTML code for the needed Javascript popped up and we were off to the races. Claude walked me through setting up an API key, getting tokens, and working through errors.
The process quickly got complicated as I needed to set up a kind of reverse proxy for the API calls to claude that meant changing the settings of the Apache web server and installing a node.js server. I was walked through this process and the testing of it easily.
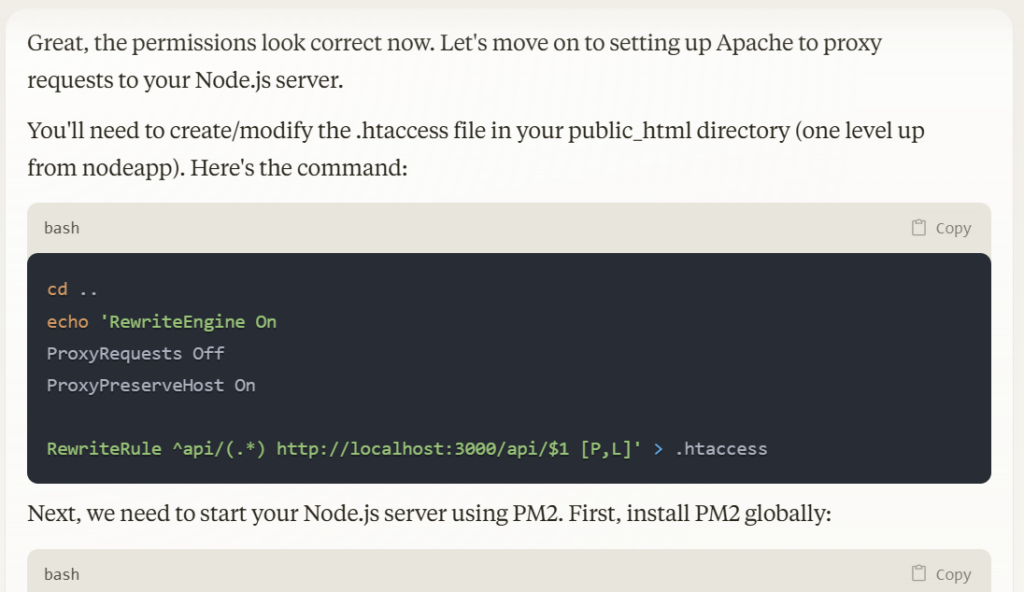
At each point, claude was positive and explained what was needed to be done. It never sighed, rolled it’s eyes, or got exasperated at me.
After about and hour, it was running an I was able to ask important questions.

Improvements were easy, making a better UI design and even creating a button to stop the audio when it got long winded.
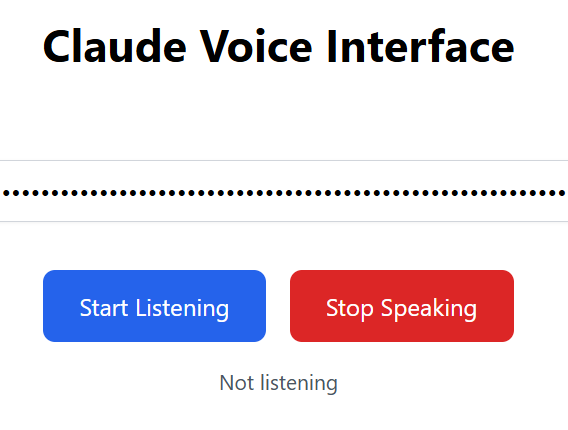
For some this may not be impressive, but to me it was mind blowing. A range of possibilities opened up in my mind. No longer stuck with googling for someone else’s work on the web that might fit my needs, I am actually able to build what I dream up.
I’ve played with a few different things to scratch my own itches and I continue to see what many others see in the use of AI in software development.
What does it all mean?
Fuck if I know.
I just looked a small slice of what AI tools might be capable of in coding. In that area, it seems clear that use of AI tools by software developers will be a game changing addition that allows more to be done in a shorter amount of time. I don’t see it eliminating the need for humans, just as pneumatic nailguns didn’t eliminate the need for human carpenters. Just powerful tools to let humans get things done.
I don’t see AI diagnosing networking problems and be able to go room to room examining fiber jackfields or replacing QSFPs. Or AI being able to read a room of execs and their body language when presenting ideas. Or AI being able to stop people from having bad video conference etiquette.
But the AI tools are currently a huge boon to software development and troubleshooting. I know many people that want nothing to do with AI and have strong feelings about it’s use. I get that. But to reject it’s use in this area is like sticking with a typewriter instead of trying a word processor back in the 1980s. A quixotic quest to maintain the status quo when the world is moving forward quickly.
Dad advice
I made a short video of dad-type advice I’d collected over the years.
Wasn’t feeling great when I made it and should have brought more energy to it.
Podcasts I enjoyed in 2024

I like listening to podcasts when driving or out riding my bike.
I remember the first days of podcasting being discussed in the #joiito IRC channel along with other early ideas that RSS would enable. The early days of podcasting required a lot of special software and manual work to be able to listen. 20+ years ago I was writing about is when I didn’t believe the term ‘podcast’ would catch on. Yes, I was wrong on that one. While RSS was the key to unlock early podcasting adoption, the podcasting world has expanded broadly with video versions on Youtube and walled garden podcasts on Spotify.
Today, podcasts are de rigueur for every media company and pundit in the world. Entire businesses wrapped around podcasts exist and the ability to listen to them easily on almost every audio platform.
Here are the top four podcasts I enjoyed the most this year:
Search Engine – Created by PJ Vogt and Sruthi Pinnamaneni, veterans of the Reply All podcast, the show is once of the best produced out there. The conceit is that PJ is answering a question listeners want to know, but they all lead to some in depth information expertly presented. Topics range from whether you should drink airline coffee to how to gain entrance to the German techno club Berghain.
404media – 404media is an investigative journalism team that works the tech and internet beat. They patrol the grimdark part of the interwebs and have a wide range of contacts from the blackhats to corporate PR teams. Only so much can go into a written post on the site, so the podcast lets the writers go a little deeper and discuss the topics as a team. The work they do is great, often breaking major stories before the larger news groups can understand the topic.
Hard Fork – Hosted by Kevin Roose of the NY Times and Casey Newton of Platformer, the podcast is a traditional discussion between of the current tech news de jour. The chemistry between the two works well and you can feel the friendship and a little competitiveness. Besides bringing up the questions the average person would ask, they are able to bring in a wide range of guests on special topics to bring actual experts into the discussion.
The Vergecast – Nilay Patel and David Pierce of the Verge also discuss the current tech news du jour, but do it differently than Hard Fork. Nilay is neither a tech cynic nor a true believer, and is willing to push guests and topics both ways. I appreciate their willingness to call bullshit on crisis management press releases and also explain how uncertain the future of new businesses and technologies are in light of the ever changing political landscape. Too often podcasts try to pretend they know the future will unfurl.
I know my choices don’t include any true crime stories or super emotional revelations, but the internet is swamped with those and they are easy to find. They aren’t the flavor of interwebs I like.
I subscribe to a wide range of other podcasts with topics ranging from beekeeping to science news to video gaming. Most of them are good, but listened to after my favorite feeds are empty.
Here other podcasts get an honorable mention:
Darknet Diaries – Host Jack Rhysider makes an incredible podcast “about hackers, breaches, shadow government activity, hacktivism, cybercrime, and all the things that dwell on the hidden parts of the network.” As someone that spent their teenage years phreaking and traveling the world of pre-internet BBSes, this is pure catnip to me. Extremely well written and produced it’s always a delight to hear. The only drawback is that the podcast is monthly.
ICYMI – ICYMI is short for In Case You Missed It. The show covers internet culture and tries to explain the nuances of complicated memes and trends. The show has gone through a few hosts and the topics vary a bit. I enjoy the shows that explain the trends and memes of TikTok and social media the most. Occasionally the show gets into reality TV drama or weblebrity mess, which I don’t care about. But when they get to discussing things like goblincore, zynternet, and #booktok, I’m all ears.
My 2024 year in books
I like to read. Having a Kindle makes it easy to take a book anywhere and with Libby, I can check them out easily from the library.
Since I read electronically, it’s easy to update Goodreads. Goodreads has a yearly challenge where you set a number of books to read and it helps track it.
This year, I set my target for 30 books and exceeded that goal with 32 read.
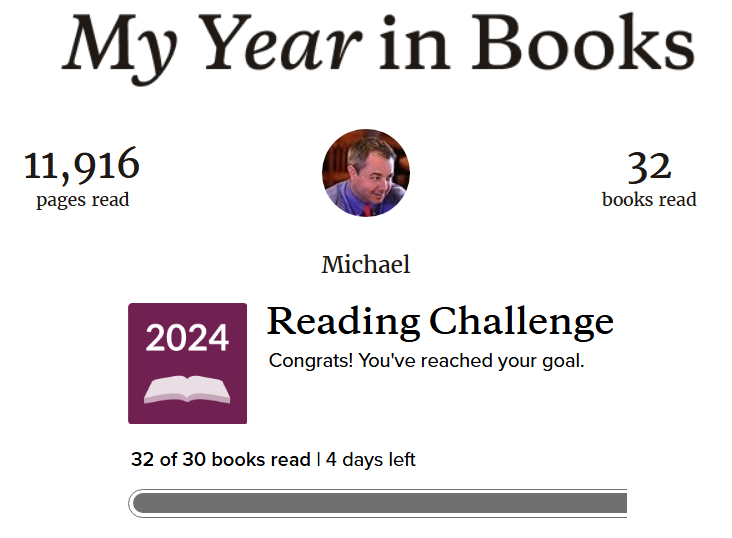
At the bottom, I’ll add the list of all the books that I read this year.
Here are the 3 books I found most interesting. They may not be the most well written, but they are the ones I enjoyed the most and think about.
Ra by qntm
The author, qntm, is also known for the slightly more discussed novel, There Is No Antimemetics Division, but I found Ra fascinating. Bringing us a world of magic as engineering in the beginning, the book makes a complete flip in the middle and creates yet another intriguing world. I wish there was a sequel, but unlikely given how the novel ends.
The Sword of Kaigen by M.L. Wang
I heard about The Sword of Kaigen on #booktok with huge amounts of praise. All of the acclaim is true. An alternate reality of an alternate Asian world filled with war, elemental magic, and family drama that keeps you sucked into the world built by M. L. Wang. It’s one of those books that’s hard to put down when it’s time to go to sleep.
Dark Wire by Joseph Cox
Joseph Cox is one of the founders of 404media, an investigative journalism site that does great work. His work on Dark Web subjects led him into the story of how the FBI got in the business of running an encrypted mobile phone company to spy on the secrets of criminal gangs on a global scale. Well written and detailed, the story is catnip to hacker types, both old and new. In addition to detailing the story of Anom phones, he also discusses the scale and scope of the illegal drug trade that operates a billion dollar economy hidden from public view.
All three of these books have my highest recommendation.
My honorable mention goes to A Wizard’s Guide to Defensive Baking by T. Kingfisher. If you are into the cozy fantasy genre, this book is a delight. Relaxing and fun, it’s a perfect book to escape the chaos of the real world.
My 2024 year in books (reverse chronological order)
The Pillars of the Earth by Ken Follett
Siddhartha by Hermann Hesse
Cursed Cocktails by S.L. Rowland
Alien Clay by Adrian Tchaikovsky
Saevus Corax Deals with the Dead by K.J. Parker
A Wizard’s Guide to Defensive Baking by T. Kingfisher
A Man Without a Country by Kurt Vonnegut Jr.
Path to Villainy: An NPC Kobold’s Tale by S.L. Rowland
System Collapse by Martha Wells
The Book of Doors by Gareth Brown
Moon Over Soho by Ben Aaronovitch
Starter Villain by John Scalzi
The Things We Make by Bill Hammack
Dark Wire by Joseph Cox
Emily Wilde’s Encyclopaedia of Faeries by Heather Fawcett
Service Model by Adrian Tchaikovsky
Ra by qntm
Arriving Today: From Factory to Front Door by Christopher Mims
Built: The Hidden Stories Behind Our Structures by Roma Agrawal
The Sword of Kaigen by M.L. Wang
Rivers of London by Ben Aaronovitch
Mickey7 by Edward Ashton
The Jinn-Bot of Shantiport by Samit Basu
Translation State by Ann Leckie
Ironclads by Adrian Tchaikovsky
Revelation Space by Alastair Reynolds
A Darker Shade of Magic by Victoria E. Schwab
The Blacktongue Thief by Christopher Buehlman
Quantum Radio by A.G. Riddle
Where the God-Knives Tread by A.L. Goldfuss
To Shape a Dragon’s Breath by Moniquill Blackgoose
A City on Mars by Kelly Weinersmith
Making candles from beeswax
Over the last few years, I’ve accumulated beeswax from the apiary and during honey harvests. I’ve made videos about harvesting the wax and refining it.
I have enough now to do some fun things with it, like making some candles.
I learned a few things in this first attempt.
The wax needs to be clean or the little bits of debris show up. The first candles had debris at the top, since the candles are made upside down.
Don’t overheat the wax. The cooling process will have less cracks if the wax is not super hot. And it’s easier to deal with the inevitable splashes.
Have plenty of molds. Making one or two candles a day is slow progress. I have more molds on the way.
I haven’t played with scented candles, but that will probably be the next experiment.